

Sunday, November 30, 2014
Cyber Monday Sale!
Friday, November 28, 2014
Studio Calico's Park Ave // A little story...

I thought I'd share a little behind the scenes story on how I ended up designing my first patterned paper for Studio Calico. It started with those mini badges you see in the kit. SC had emailed me a few months ago, requesting that I design some badges for this December kit. They had specifically wanted a floral image for one of the badges, so I obliged and chose a photograph I had taken in Paris.

SC asked to see the original photograph and they liked it so much that they wanted to use it as a black & white patterned paper for the Park Ave kit. I was definitely excited! I know that 'photographs as patterned paper' isn't everyone's cup of tea, so with the opportunity to design the B-side for this paper as well, I kept it graphic and clean with a simple block grid pattern. So for those of you who aren't fans of photographs as patterned papers, hopefully you'll like the B-side instead.

Seeing the In a Creative Bubble brand on actual, physical products never gets old. Whenever I get my SC kits and I know that something I've designed is included in them, I always look for that item first to see how my designs turned out in real life :)

Thanks for listening and sticking around! Just a reminder, Studio Calico is also running a couple of amazing sales this weekend! These are the biggest sales of the year:
- BLACK FRIDAY: Mystery Kits & Grab Bags! | Friday, 10AM EST
- SMALL BUSINESS SATURDAY: SC Classes Sale! | Saturday, 10AM EST
- CYBER MONDAY: Digital Shop Sale! | Monday, 10AM EST
Hope you all have a lovely weekend!
Wednesday, November 26, 2014
Tutorial // Letterpress Tags for December Daily

Here's my process for creating a batch of letterpress tags:
Supplies Needed
+ Letterpress Bundle
+ Letterpress inks (optional: substitute for pigment inks if you're short on time & want easier clean-up)
+ Letterpress plates - choose your favorites! The alphas are my personal fave.
+ Letterpress paper
+ Waterbrush
+ Watercolors
I had a pack of mini letterpress flat cards on hand (sized 2.125x3,375") so I decided to use those for my tags and I plan on stapling them to a 3x4 card when I actually use them in my December Daily. The nice thing about letterpress paper is that it is quite thick, so you can use watercolors on it with less chance of the paper warping.
I started by watercoloring a bunch of letterpress cards. I used a thick waterbrush and traditional Japanese watercolors I bought when I was in Japan, but I also love the Peerless watercolor sheets and think they provide just as vibrant and opaque colors. I mainly focused on painting gradients on my cards because I knew they would add a nice pop of color.
Tip: If you want your colors to blend seamlessly without a harsh line, apply paint while the paper is damp. It'll allow the watercolors to flow and blend together. On the left is an example of allowing the watercolor paint to dry before painting the next hue, and the right is an example of letting the colors blend by painting before the paper has dried.

Here's how all my tags look together once I finished watercoloring them. It gives you an example of all the different possibilities there are!


I did all my watercoloring at one time, and let the cards dry. Now it's time for letterpressing! I started by putting one of my watercolored cards on my letterpress platform base. I chose my letterpress plate and put some adhesive behind it, then positioned it face down on top of my card.

I closed the lid of my letterpress platform, which allowed my letterpress plate to stick on the lid and be positioned perfectly.

Make sure to use the ink guide strips around your letterpress plate. It'll ensure that you won't get stray ink on your plate, which may lead to a mess and stray ink! Choose your letterpress ink and add some to your ink base, then roll the ink with your brayer until your brayer is quite evenly covered. Apply ink to your letterpress plate with the brayer. Even if you choose to use pigment inks, I'd recommend using a brayer to apply ink to your letterpress plate because it helps make even coverage.

Make sure you remember to remove your letterpress ink guides, or else they'll get pressed onto your paper!

Close your letterpress platform and run it through your manual die-cut machine. I'm using a Sizzix BigShot and it works perfectly for letterpress.

Open your letterpress platform and here's your completed letterpress tag! Super simple, right? Now you can repeat the process and create a lot more letterpress tags for your holiday scrapping.


Another thing you can do is to look through your stamp collection to see which stamps you can use to combine with your letterpress tags. For example, underneath the letterpressed 'M' (from this alpha set) on the blue tag I stamped the word 'MERRY'. Underneath the letterpressed '2014' (using these numbers), I stamped 'A December to Remember'. It's really easy to further customize your letterpress tags with stamping!

Here are the various letterpress tags I ended up making with few different ink colors and lots of letterpress plates. Studio Calico has a lot of beautiful and unique letterpress plates that you can check out over here. There are several designs that are just perfect for holiday crafting!


Now that I have these all prepared, I can't wait to use them in my December Daily! Hope this inspires you to pull out your letterpress supplies and make some letterpressed pieces for your own crafting projects.
If you're interested in learning more about letterpress, I taught a Letterpress 2.0 Workshop at Studio Calico earlier this year. This class was a sequel to Tina's introductory Letterpress class, and the two classes may be purchased as a bundle over at SC. Happy letterpressing!
Tuesday, November 25, 2014
December Daily 2014 // Album + Title Page

Album
For my album, I'll be using the 6x8 handbook that came with Ali Edwards' December Daily kit last year. I ended up using a different album last year, which is why I still have this one left over. I'm planning on covering the chipboard part with some pretty paper, but I just haven't found the perfect one yet. So right now, the album is unfinished and undecorated, but that's ok. I'm sure I'll get around to it when I find a paper I love, and when that happens, I'll share that later!
Title Page
I put together my title page for my album a little while ago though! I always like starting my DD with a title page because without it, my album feels incomplete. This year's title page was inspired by all the patterned papers I pulled out for this project while sorting through my stash (supplies post here).
I really like how the different patterned papers looked together, so I decided to create a grid of circles for my title page to showcase the different colors and patterns. It sort of feels like a color swatch for the inside pages. I could have punched out the circles with a circle punch, but since I was OCD about my idea and specifically wanted the circles smaller than 1" (to be the same size as that flair button), I used my Silhouette to cut out 0.85" circles. It was easy to line up the circles since I chose an older piece of Crate Paper grid paper for the background and the grid worked as my guide.

I traced the .png file for 'merry' from my Be Merry Photo Templates in the Silhouette software to turn it into a cut file. I cut out the word three times with my Silhouette from black cardstock and stacked the pieces to create a thicker embellishment. The 'memories' banner was a quick piece I made in Photoshop and cut out with my Silhouette for my title page.

I filled the little circles (which are 99% old patterned papers from past Studio Calico kits) with some embellishments - sequins, wood veneers, and stickers to make the page more festive. I believe the 'joy' flair button is from Kelly Purkey's 2012 DD kit.

Even though this is just a title page, it makes me happy to have started my December Daily! Are you planning on making a December Daily too this year?
Tutorial // Joy Holiday Card

I started by cutting out a 3" circle in the middle of my cardstock base, and backing it with a blended background made with Mama Elephant's pigment inks. I heat embossed some snowflakes from Season's Greetings with white embossing powder and added a few white dots with my gel pen to create the snowy scene.

Next I stamped and die-cut the cute girl from Alpine Carolers. I colored her in with watercolor pencil crayons.

I stamped the letters for 'JOY' using Balloon Letters as well as the cute balloon giraffe from Balloon Et Cetera, and carefully cut them out. The giraffe may seem out of place for a holiday card, but my friend who I'm giving the card to loves giraffes and I know she'll appreciate this balloon stamp! I also grabbed some embroidery thread to be the string for my balloons.

I carefully used washi tape to tape embroidery thread behind each balloon, and I used foam adhesive to glue the balloons to my card. I twisted the four pieces of thread together at the bottom and tucked them behind my die-cut circle, securing them behind the cardstock with washi tape.

I adhered my Alpine Caroler girl to my card, making sure her hand was overlapping the thread to make it look like she is holding the balloons. I chose some silver washi tape for the bottom of the card.


Hope you enjoyed a look into my process. Be sure to check out Mama Elephant's lovely new stamp sets! I adore them. Thanks for stopping by!
Monday, November 24, 2014
December Daily 2014 // Supplies + Organization

Let's be honest. I have tons of scrapbook supplies and I love holiday themed products. Looking at my stash, I also have lots of leftovers from last year's DD project and the previous years as well. Seeing how much holiday product I had in my stash led me to the decision to curate my own kit this year. There are lots of beautiful holiday kits out there (the official Ali Edwards December Daily kit is still available too), but I decided to pull together my own papers and embellishments for this year's project. It feels good to be able to use up some of my holiday stash! I am still in love with a lot of these supplies, and no one will know if they're a few years old.
Of course, I couldn't resist some newer products here and there. I do have lots of leftovers from past Studio Calico kits (Pine Hill is particularly good for the holidays!), the journaling cards (only) from Kelly Purkey's kit, Mama Elephant's holiday stamps, and Elle's Studio holiday tags and embellishments. Though Paislee Press/Gossamer Blue's On My Desk collection isn't holiday-themed, I love the gold foil bits in it so I've definitely pulled it out for my DD as well.
Since I don't plan on premaking my DD pages, I've found the key to being able to work efficiently on the project throughout the month is to have all the supplies organized together. I wrote an extensive post last year on my DD organization, and I've pretty much stuck to the same organization system this year, save for switching on the multiple compartment candy box with a sturdier bead organization container. You can read last year's post over here.
I thought I'd show you some of the supplies I've chosen for this project as well, since I'm not using a kit this year. I broke things down by category and it'll give you a good idea of the stuff I plan on using!
Patterned Paper
I started by pulling out patterned paper from my stash, which is mainly from past Studio Calico kits. It's from my papers that I start to get a sense of my album's color scheme, which tends to lean towards the bright and colorful side. I knew I wanted lots of reds, greens, and aquas, with pops of yellow. I also found lots of neutrals to use in subtle patterns.
Not pictured: Specialty papers - transparencies and vellum from my stash.

Alphas
Lots of thickers. Lots of mini alphas...I have a couple of Basic Grey sheets and Elle's Studio sheets.
Not pictured: I also found a bunch of retired KP alpha stickers and SC alpha stickers to use.

Journaling Cards
Pretty self explanatory - since I'll be using the 6x8 format for my DD again this year, I wanted a variety of journaling cards to use. I have some specialty ones, hoarded from LifeLovePaper's screenprint packs, Gossamer Blue/Paislee Press' On My Desk collection, and from past DD kits. I also pulled out whichever cards I thought would work for the holidays from my past Studio Calico kits. I caved and got Kelly Purkey's beautiful cards from her kit, designed by my talented friend Christine Herrin (I didn't purchase the whole kit but KP kindly let me buy the cards). It's an eclectic mix and I'm happy to have lots of vivid colors.

Digital Supplies
To get ready for my DD, I printed a bunch of my new holiday printables in advance. I also used my Silhouette to get some die cuts ready. All digitals are from my digital holiday release in my shop.

Letterpress
I also knew I wanted to incorporate some letterpress pieces in my DD! Letterpress is a bit more time-consuming so rather than making a couple tags when I need them, I decided to premake a whole bunch of them before December. The letterpress plates I used are all from Studio Calico. Will have a tutorial on this soon!

Embellishments
Embellishments are a must in my DD! I organized all of my little embellishments in a plastic bead container. I like how the dividers are adjustable so I can customize the size. As you can see, I pulled out one of the dividers so that my long labels would fit in the compartment. A lot of the embellishments are from Ali's DD 2013 kit, and I also have a bunch of Studio Calico wood veneer pieces and embellishments as well. Flair buttons are from a bunch of sources - there are a couple of SC ones and a some from Kelly Purkey's 2012 DD kit, I believe.

Miscellaneous Embellishments
Larger embellishments I pulled out - label stickers, word stickers, tags (thankful I still have a sheet of Jennifer Pebbles' Awesome Christmas collection from years back!), Studio Calico puffy stickers and chipboard shapes, and enamel dots.

Stamps
As you all know, stamps are my favorite! I have lots of old and new holiday stamps that I can't wait to use. Here's a random selection I pulled out to show you :)

Trims + Washi Tape
I pretty much use washi tape on every project I make. I pulled out a selection of aqua/red/green/metallic washi tape from my stash - these are all from MT and were purchased in Japan. The ribbons and trims are from Ali Edwards' 2013 DD kit. The twine has a thread of gold metallic in it and is so pretty!

Tags + Envelopes
Finally, a miscellaneous assortment of tags and envelopes from my stash. I love incorporating envelopes in my DD, whether it be for some hidden journaling, additional photos or my wish list!

The majority of these supplies are things I already had on hand, and it makes me happy that they'll get used instead of hoarded/forgotten forever! I will probably dig into my stationery collection a bit too for a couple of extra special pieces. That's pretty much it! Now that I have all my supplies together, let the December Daily-ing begin!
Friday, November 21, 2014
Shoppe Update: Be Merry Collection
Here's what you'll find in my shoppe:
Be Merry Journaling Cards
I've released a lot of journaling cards already, but I know some people prefer a classic black and white color scheme so I came up with this set! It would look beautiful paired with red, green or gold.

Be Merry Photo Templates
Twelve fully customizable digital photo templates (as layered PSDs), perfect for your holiday scrapping. This set was a labor of love since I first handwrote the lettering with a brush, then digitized the words, and finally conceptualized the templates. Hope you like them!
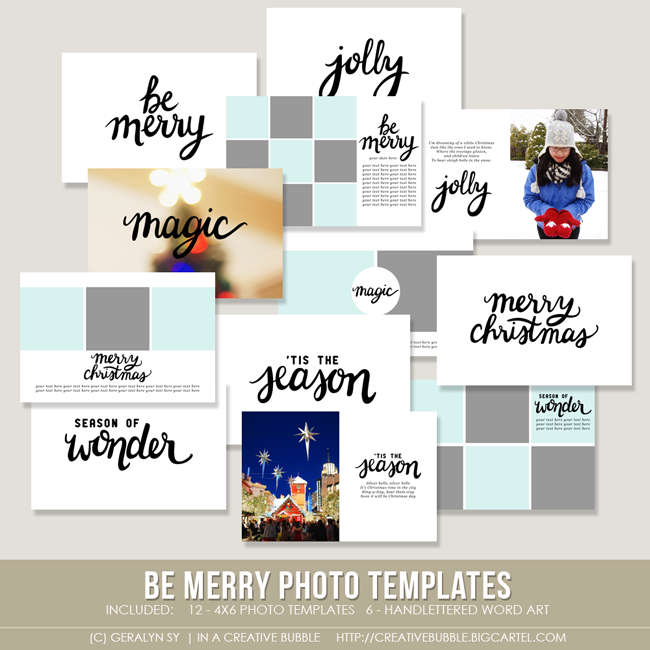

Be Merry Digital Stamp Brushes
You all know how much I love stamps, so it was a pleasure to design some digital stamps for my holiday collection. This set comes with both individual .pngs + an .abr brush file. The little ampersand, diamond, 2014, and asterisk all fit inside the circle outline stamps, and the deer may be my favorite! You'll also find some of my handlettering again.


Finally, some cut files that would be perfect as a filler page or divider in your December Daily or PL album! There are six designs, but I've sized them to be both 4x6 and 6x8 so you have some different options to choose from. They are .pngs + .svgs - super simple to use with your diecut machines.

That's all from me this holiday season. Hope you find something you like in my shoppe! I'll be using these products for my own December Daily, so hopefully I'll get around to sharing some inspiration here and there. If you use any of my products, please send me a link or tag me on instagram (@gjoysy / #inacreativebubble). I would love to see! Thank you so much and enjoy!
Saturday, November 15, 2014
Mama Elephant November Stampede
Welcome to the Mama Elephant Release Design Team blog hop! Our newest release is now live and available for purchase in the store! You should have arrived here from Pamela's blog, but if you get lost along the way, you can just head back to the Mama Elephant blog for the full list.
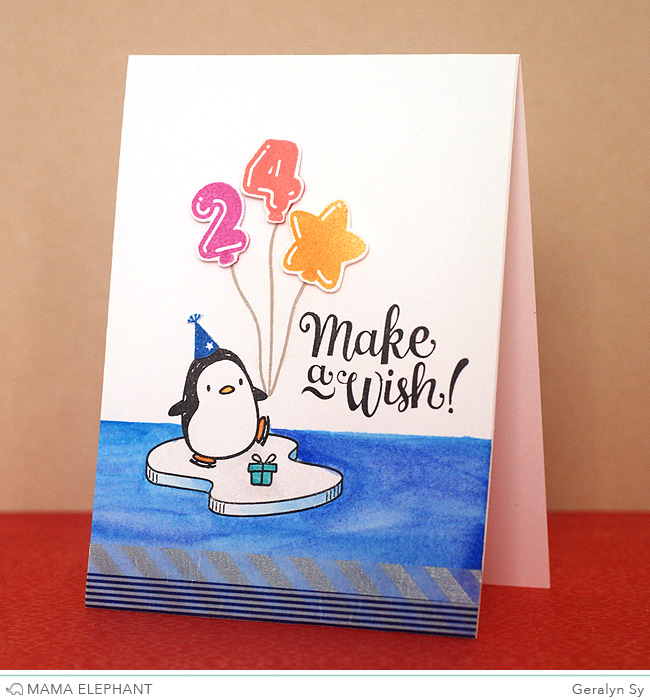
For my card, I created a little scene with Arctic Penguins and the new Balloon Etc set! I love that I could use the numbers from Balloon Etc to customize the card for my friend's upcoming birthday. I watercolored the water surrounding the ice with traditional Japanese watercolors, and the sentiment is from Make a Wish.
To celebrate the new release, Mama Elephant is giving away one of each of the new stamps released! Winners will be chosen at random from the collective blogs in the Stampede. Winners will be announced on the blog on the last Stamp Highlights day. You have up to 3 chances to qualify to win!
Just leave a separate comment for each!
» Leave a comment on this blog post «» Like/share us on Facebook: facebook.com/mamaelephant «» Follow/tweet us on Twitter: twitter.com/heymamaelephant «
Your next stop on the hop is Ashley. Have fun!
Subscribe to:
Posts (Atom)